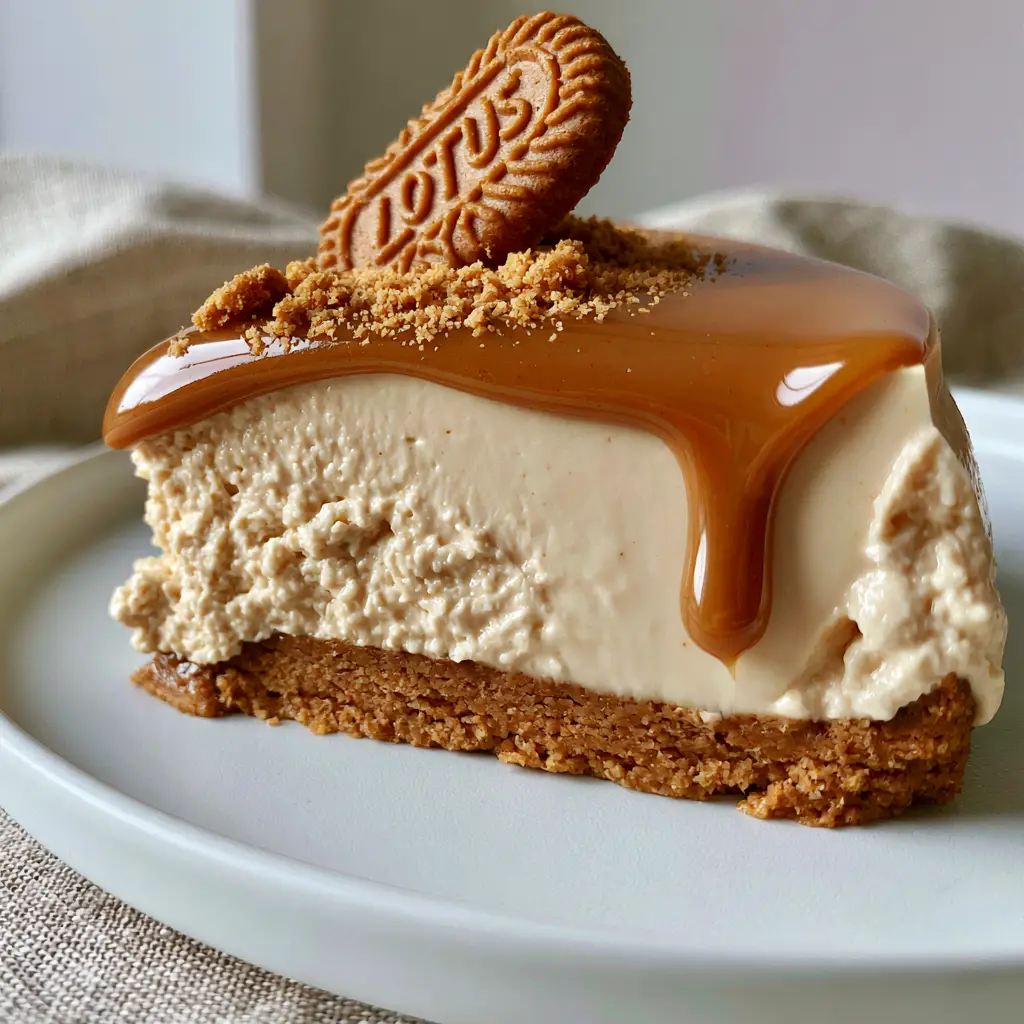
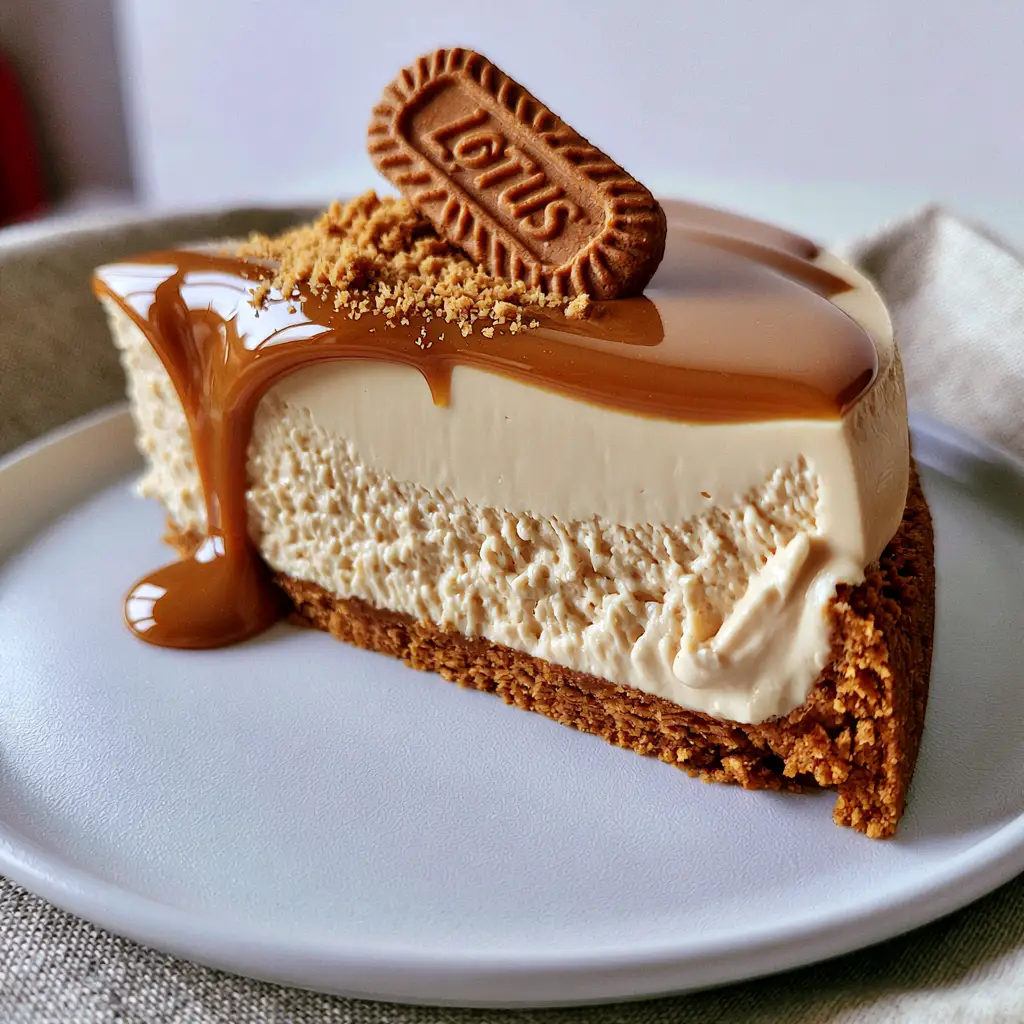
The No Bake Biscoff Cheesecake is more than just a dessert; it is a visual and textural triumph that combines the spiced warmth of speculoos with the silky luxury of whipped cream cheese. Imagine a macro side view of a single thick slice, sitting elegantly on a matte white plate, glowing under the soft natural morning light of a kitchen window.
This recipe captures that exact professional aesthetic, featuring a 5cm (2-inch) thick layer of ultra-smooth pale beige filling resting atop a 1cm (0.4-inch) compressed dark golden crust. The crowning glory is a 3mm (0.1-inch) glossy amber Biscoff glaze that exhibits a signature slow drip down the side, finished with a precise sprinkle of biscuit sand.
Whether you are hosting a dinner party or simply satisfying a deep craving for cookie butter, this No Bake Biscoff Cheesecake delivers a handheld smartphone-photo-worthy result every single time. By following this scientifically balanced method, you will achieve the structural integrity needed for that perfect 45-degree angle biscuit garnish without the need for a gelatin-heavy, rubbery texture.
The Architecture of the Perfect Speculoos Dessert
- Structural Integrity: A precisely compressed 1cm (0.4-inch) speculoos base provides the crunchy foundation required to support the massive 5cm (2-inch) filling layer.
- Visual Contrast: The pale beige whipped filling offers a sophisticated color palette against the dark golden crust and the vibrant amber melted glaze.
- Sensory Texture: Every bite transitions from a glossy, melting glaze to an airy, cloud-like mousse, ending with the signature snap of a Lotus biscuit crumb.
- Garnish Precision: We utilize fine biscuit “sand” and a whole biscuit placed at a 45-degree angle to create professional height and visual interest.
Essential Components for Your Cookie Butter Creation
Lotus Biscoff Biscuits: You will need two full packs to achieve the 1cm (0.4-inch) thick base and the decorative crumbs. These biscuits provide the unique cinnamon and caramelized sugar profile essential for the No Bake Biscoff Cheesecake.
Unsalted Butter (Melted): This acts as the “glue” for your crust. Using 1/2 cup (113g) of melted butter ensures the speculoos crumbs adhere into a compressed, solid foundation that won’t crumble when sliced.
Full-Fat Cream Cheese: It is imperative to use the brick-style cream cheese, not the spreadable tub variety. This provides the 5cm (2-inch) thick filling with the necessary fat content to set firmly while remaining ultra-smooth and pale beige.
Lotus Biscoff Spread (Smooth): This is used twice: folded into the filling for color and flavor, and melted for the 3mm (0.1-inch) glossy glaze. Its melting point is perfect for creating that slow-drip effect.
Heavy Whipping Cream (35% Fat): When whipped to stiff peaks and folded in, this aerates the cream cheese. This is the secret to achieving that “whipped” visual cue described in the recipe blueprint.
Icing Sugar (Confectioners’ Sugar): We use a small amount, 1/2 cup (60g), to stabilize the whipped cream and add a touch of sweetness without graininess. This keeps the filling texture professional and smooth.
Tools for a Professional Visual Result
To achieve the macro-level perfection of a single thick slice, you need an 8-inch (20cm) springform pan. This allows for the clean removal of the cheesecake, preserving the 5cm (2-inch) vertical walls of the filling. A flat-bottomed glass is also essential for compressing the speculoos crust to an even 1cm (0.4-inch) thickness.
For the filling, an electric hand mixer or stand mixer is required to incorporate enough air into the heavy cream. To get that 3mm (0.1-inch) thick glossy amber Biscoff glaze, a small offset spatula will help you spread the melted cookie butter to the very edges, encouraging the natural drip.
Forging the 1cm Compressed Speculoos Crust
Crushing for Texture
Begin by pulsing 250g (approx. 25 biscuits) of Lotus Biscoff biscuits in a food processor until they resemble fine sand. You want a uniform texture so the 1cm (0.4-inch) base is structurally sound and lacks large gaps that could cause breaking.
The Compression Technique
Mix the crumbs with 6 tbsp (85g) of melted unsalted butter until the mixture feels like wet sand. Pour this into your lined springform pan and use the bottom of a flat glass to press down firmly. This compression is vital to achieve that dark golden, compact look seen in the smartphone photo style.
Achieving the 5cm Whipped Pale Beige Filling
Whipping for Volume
In a cold bowl, whip 1.25 cups (300ml) of heavy cream until stiff peaks form. Set this aside; it is the “air” that creates the 5cm (2-inch) height. In a separate bowl, beat 500g (17.6oz) of room-temperature cream cheese with 200g (0.7 cup) of Biscoff spread until the color is a uniform pale beige.
The Gentle Fold
Fold the whipped cream into the Biscoff mixture using a silicone spatula. Do not stir vigorously, or you will lose the volume. The resulting filling should be thick enough to hold its shape but airy enough to look “whisked” and light. Smooth this over your chilled crust and refrigerate for at least 6 hours.
The 3mm Glossy Amber Glaze and Drip
Melting to Perfection
Gently melt 200g (0.7 cup) of smooth Biscoff spread in the microwave in 10-second bursts. It should be pourable but not hot. Pour it over the chilled cheesecake, tilting the pan slightly to ensure a 3mm (0.1-inch) even layer. To get the “slow drip” effect, use a spoon to guide a small amount over the edge of the crust.
The Final Garnish
While the glaze is still slightly tacky, sprinkle your reserved biscuit sand around the perimeter. Finally, take one whole Lotus biscuit and press it into the center at a 45-degree angle. This creates the height and professional finish that makes the No Bake Biscoff Cheesecake a social media standout.
Expert Tips for Success
- Room Temp vs. Cold: Ensure your cream cheese is at room temperature to avoid lumps, but your heavy cream must be ice-cold to reach stiff peaks.
- The Clean Cut: For a perfect macro side view, dip your knife in hot water and wipe it dry between every single slice of the cheesecake.
- Setting Time: Do not rush the chill. A minimum of 6 hours is required to support the weight of the glaze and the 45-degree biscuit garnish.
- Drip Control: If your glaze is too runny, let it sit for 2 minutes before pouring to ensure it stays 3mm (0.1-inch) thick on top.
Pairing Your Cheesecake for the Ultimate Experience
This rich, spiced cheesecake pairs beautifully with a refreshing beverage to cleanse the palate. Consider serving it alongside a chilled Apple Island Splash for a fruity contrast. If you are serving a full dessert spread, these slices look incredible next to red velvet cake pops or even a tray of snickerdoodle cookie cups.
For those hosting a brunch, the warm spices of the speculoos complement savory items like a zucchini and bacon slice or even a light Greek salad to balance the sweetness of the meal.
Frequently Asked Questions
No, it is highly recommended to use full-fat brick cream cheese. Low-fat or tub versions have too much moisture and will not support the 5cm filling height.
Melt the Biscoff spread until pourable but not hot. Pour it onto the center and gently nudge it toward the edges with a spoon to create controlled, slow drips.
It needs at least 6 hours in the refrigerator, but overnight is best for the cleanest slices and to ensure the 1cm crust stays compressed.
Lumps occur if the cream cheese is too cold. Ensure it is at room temperature before beating it with the cookie butter spread for a pale beige, smooth finish.
The Ultimate No Bake Biscoff Cheesecake Recipe
No Bake Biscoff Cheesecake: An Ultra-Creamy Cookie Butter Masterpiece
Ingredients
Equipment
Method
- Pulse biscuits into fine crumbs and mix with melted butter until the texture of wet sand is achieved.
- Press into the bottom of an 8-inch pan to a 1cm thickness. Chill in the freezer for 15 minutes.
- Whip heavy cream to stiff peaks in a cold bowl.
- Beat cream cheese, 200g Biscoff spread, and icing sugar until a pale beige smooth mixture forms.
- Gently fold the whipped cream into the cheese mixture. Pour onto the crust and smooth to a 5cm thickness.
- Melt remaining Biscoff spread and pour over the chilled cake to create a 3mm glossy layer.
- Sprinkle biscuit crumbs and place one whole biscuit at a 45-degree angle. Chill for 6 hours.
Notes
Do not use tub-style cream cheese as it will not set.
Concluding Your Culinary Masterpiece
Creating a No Bake Biscoff Cheesecake is an exercise in layering textures and flavors. From the crunch of the compressed 1cm crust to the airy 5cm pale beige filling, every element is designed for maximum sensory impact. This cheesecake is not just a treat; it is a centerpiece that looks as good as it tastes.
We invite you to share your results! If your glaze achieved that perfect amber drip, tag us or share your photos on Pinterest. Your feedback helps our community of home cooks grow, so please leave a comment below with your experience.